To install
Ultra Find, use the
Extension Manager in Visual Studio 2010 located underneath the
Tools menu. Select the
Online Gallery and use the search bar to locate
Ultra Find, click
Download, then
Install.
- Note: Be sure to restart Visual Studio at least once after installing the extension. The Extension Manager will display a notice to do this, but the notice gets covered up when it launches the Getting Started page.
- Note: If you are planning to use Windows Search, you must first configure source code content so that it is indexed (if you haven't already). By default, Windows Search does not index source code content. You should add the file extensions you want to have indexed, and set the appropriate settings for them, so that the file content is indexed, and not just the file properties. See the topic Setting Up Windows Search to learn how to configure Windows Search for use with Ultra Find.
Ultra Find can be launched from the
Edit menu in the same location as the
Find in Files screen.

Some Visual Studio environment settings do not include
Find and Replace on the
Edit menu (such as VB environment). In this case, customize the
Edit menu to have the menu item appear where you want it, using
Tools > Customize.
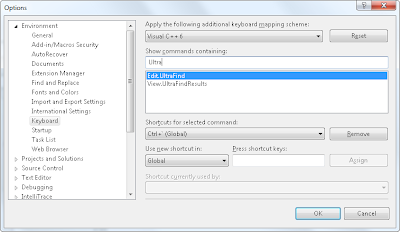
The command can also be accessed with the key combination
Ctrl+` (on US keyboards, this is the reversed apostrophe, located underneath the escape key). Like other key combinations, this can be reconfigured through Visual Studio.
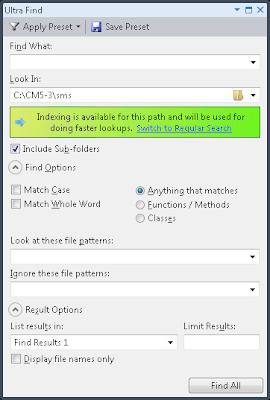
Once the command is invoked, you will be presented with the
Ultra Find tool window, which resembles
Find in Files.
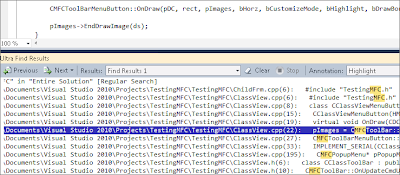
The
Ultra Find results window can be accessed from the same location as the other Find Results windows, underneath the
View menu.

The results screen automatically appears whenever searches are made, just like regular
Find in Files.
By default, there is no key combination assigned to this command, but one can be assigned through Visual Studio.
 Ultra Find
 does not require
Windows Search, but it is highly recommended to use it when searching across large code bases.
See the topic
Setting Up Windows Search to learn how to configure
Windows Search for use with
Ultra Find.


