Sunday, August 22, 2010

Ultra Find

Ultra Find is a Find in Files substitute for Visual Studio 2010.

Take advantage of Windows Search and sift through millions of lines of code in seconds. Ultra Find also enables you to:

  • Search for classes and methods
  • Exclude file patterns
  • Zoom in Find Results
  • Highlight matches
  • Configure presets
  • Maintain an unlimited number of Find Results windows

Ultra Find is multi-instance friendly and keeps its settings and search history synchronized between multiple instances of Visual Studio in real time.


Using Windows Search is not required, but is highly recommended when searching across large code bases.

Zoom in and out of Find Results by using the mouse wheel (while holding the Ctrl key) or by changing the zoom percentage located next to the scroll bar.


Maintain presets and restore your frequently used search settings:


Change navigation behavior:


Customize colors by changing the Find Results Window color category in Tools > Environment > Fonts and Colors.


See Getting Started for additional info on how to install and use Ultra Find.

Ultra Find (Getting Started)

To install Ultra Find, use the Extension Manager in Visual Studio 2010 located underneath the Tools menu. Select the Online Gallery and use the search bar to locate Ultra Find, click Download, then Install.

  • Note: Be sure to restart Visual Studio at least once after installing the extension. The Extension Manager will display a notice to do this, but the notice gets covered up when it launches the Getting Started page.

  • Note: If you are planning to use Windows Search, you must first configure source code content so that it is indexed (if you haven't already). By default, Windows Search does not index source code content. You should add the file extensions you want to have indexed, and set the appropriate settings for them, so that the file content is indexed, and not just the file properties. See the topic Setting Up Windows Search to learn how to configure Windows Search for use with Ultra Find.

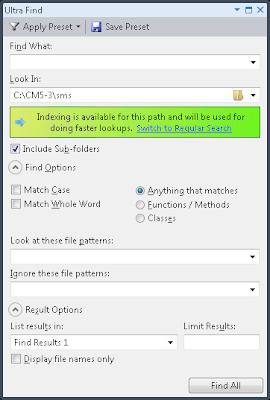
Ultra Find can be launched from the Edit menu in the same location as the Find in Files screen.


Some Visual Studio environment settings do not include Find and Replace on the Edit menu (such as VB environment). In this case, customize the Edit menu to have the menu item appear where you want it, using Tools > Customize.

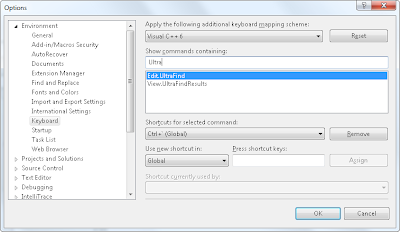
The command can also be accessed with the key combination Ctrl+` (on US keyboards, this is the reversed apostrophe, located underneath the escape key). Like other key combinations, this can be reconfigured through Visual Studio.

Once the command is invoked, you will be presented with the Ultra Find tool window, which resembles Find in Files.

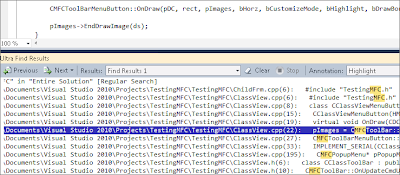
The Ultra Find results window can be accessed from the same location as the other Find Results windows, underneath the View menu.


The results screen automatically appears whenever searches are made, just like regular Find in Files.

By default, there is no key combination assigned to this command, but one can be assigned through Visual Studio.

Ultra Find does not require Windows Search, but it is highly recommended to use it when searching across large code bases.

See the topic Setting Up Windows Search to learn how to configure Windows Search for use with Ultra Find.

Ultra Find (Setting Up Windows Search)

These instructions explain how to configure Windows Search for use with Ultra Find.

Windows Search comes with Windows Vista and Windows 7. It is also available as an add-on for Windows XP. If you are using Windows Server 2008, you may need to add the Windows Search feature manually using Server Manager. Also, ensure that this service is running and not disabled.

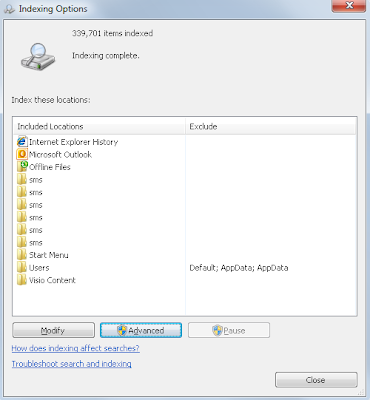
The index can be configured through Control Panel (search for Indexing Options).


Use this screen to add and remove indexed locations. Add each root location of your source tree to the index. More importantly, make sure all necessary file extensions are configured to have content indexed.

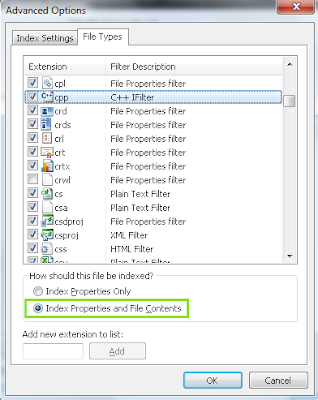
Click the Advanced button on the Indexing Options screen, then select the File Types tab. Select and add all the file extensions that you would like to have indexed.


Make sure the Index Properties and File Contents radio button is selected for each file type.

Indexing should be enabled for each file extension that you work in. Some examples include: asa, asax, ascx, asm, asmx, asp, aspx, bat, c, cc, cmd, config, cpp, cs, csproj, css, csv, cxx, def, disco, dtd, h, hh, hpp, htm, html, hxx, idl, inc, ini, inl, log, mc, mk, mof, rc, rdl, resx, srf, svc, tlh, tli, vb, vcproj, wsdl, xaml, xml, xsd, xsl, xslt

Upon accepting the changes, Windows Search will perform a full crawl of each indexed location. Depending on how many files there are, this can take a considerable amount of time. Ultra Find will display a progress notification, if you choose an indexed location while Window Search is in the process of crawling.


When the crawl is complete, Windows Search will incrementally track new changes of the indexed content.